Producing 3D printed stencils from images

Background

So by way of background, I know this is not a unique post on the workflow to produce 3D prints from images. However, I hope it gives some guidance specifically for taking images and converting them into stencils for use in glass work.

The conventional way of achieving this involves cutting shapes out of Mylar sheets. These stencils are used to hold glass frit, which is then fired. For complex shapes with narrow sections, Mylar is a little too thin and flexes too much when taken off.

This method attempts to limit this by 3D printing a slightly thicker stencil. The balance here is between having enough thickness to keep the template rigid and not being so thick that the frit sags when the stencil is removed.

Work flow

To get an STL file that can be printed, I use Inkscape and OpenSCAD. Inkscape converts the image to a scalable vector format that can be cut out of a square of plastic in OpenSCAD.

Converting an image to a vector based format

I convert images to a vector based format to get a smooth edged graphic. You can miss this stage out and take a PNG straight into OpenSCAD using surface however as most images are JPEG format there will be noise artifacts and the edge is very jagged as each of the pixels in the original image are visible.

I will start with a simple noisy JPEG image:

samplegraphic

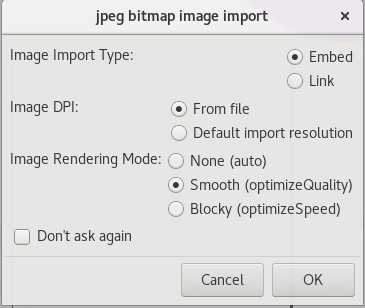
If we open this in Inkscape we will be asked to determine how to convert. I optimise for smoothness as this is a quick process with these types of graphics:

inkscape_jpeg_import

Once the image is imported, we can convert it paths using the Trace Bitmap … option on the Path menu. The options on this dialog are key – feel free to play with the values but my recommendations for black and white images are:

inkscape_trace_bitmap1

In the Mode tab I use Brightness cutoff; the key changes are on the Options tab:

inkscape_trace_bitmap2

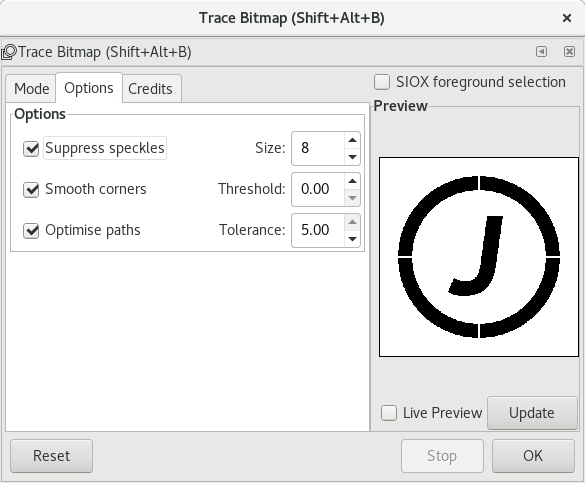
Here I set the Smooth corners threshold to 0.00 (the minimum) because I want sharp corners and the Optimise paths to 5.00 (the maximum) to reduce the number of segments in the arcs.

At this point,  I save the resulting file as a DXF file (Desktop Cutting Plotter). Note, whilst there are a number of warnings about using this format with OpenSCAD, I have not met any problems importing this (yet!).

Using the DXF file to make a stencil

The stencil can now be put together in OpenSCAD. Typically, the shape will be cut out of a cube. The difficult bits are getting the graphic to be a sensible size and putting it in the centre of the cube.

Typically these stencils are to create designs that can fit on 10 cm tiles, which means I am looking at stencils in the 5-8 cm range. For this example which is round I have chosen 6 cm as the size. The frame around it is visual guess work – in this case 7.5 cm looked about right.

1 mm thick stencils give the right balance of stiffness and depth of frit glass when the stencil is printed in PLA plastic.

Putting this all together, if the exported DXF file is in samplegraphic_ink.dxf, the code to build the stencil is:

difference() {
cube([75,75,1]);
resize([60,0,2], auto=[true, true, false])
    linear_extrude(height=10)
    import("samplegraphic_ink.dxf");
}

The resize function that allows us to maintain the scale of the piece given one dimension makes this easier to achieve. I set the height of the stencil to cut out to 2mm because I have occasionally had artifacts in the STL file when it is exactly the same height as the cube it is cut out of.

When it is rendered it looks like this and at this point it can be exported to STL:

test

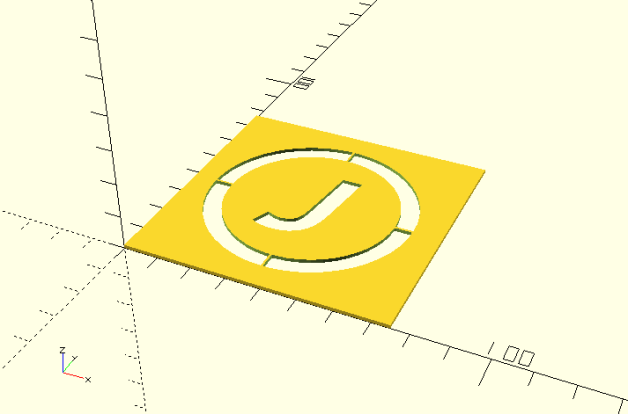
That’s all there is to it. Enjoy.

Linking a Kindle to a D-Link 868L Router

This I hope is the post that fixes your connectivity problems between Kindles and D-Link N routers. We have an 868L but there seems to be a load of extra posts around the internet about this problem but the solutions seemed to be conflicted.

I recently replaced my old router and copied all the settings across and all devices connected except our Kindles – we have Kindle 3’s (the ones with the keyboards) and Paperwhites.

I got these to connect by not using WPA2 as a wireless security protocol. So WPA Mode should be set to WPA and the Cipher Type should be set to TKIP. At this point all of the Kindles connected.

I post this because the other options that I have seen out there (change the SSID to uppercase, disable n mode – use a/g only) did not work for me and there seems to be a lot of frustrated people out there.

Hope this helps. To Amazon and D-Link, can you figure out which of you needs to patch their firmware and fix this. BTW my 868L is on firmware version 1.07 and the hardware version is A1 and the Kindles have the latest firmware too.

Technicolor TG582n Pro and OpenDNS

So long story short, I got my broadband upgraded and as part of this received a Technicolor TG582 Pro as part of the bundle. I had no intention of using this on the basis my existing router was up to the ADSL 2+ (yes – I live outside of a cable area).

So all went well with the upgrade however the 5* rated router that I had started to not respond – looked like some sort of CPU spike. Having read the reviews of the Technicolor, I was not expecting much from it, but at least if I used the device I could have a sensible conversation with Demon technical support.

Initial impressions of the router were not good, the wizard interface seemed to want to prompt for a password every screen on Firefox/Chrome but struggled through the basic set up to get a link running at the same speed as the 5* router and with better Wifi coverage too.

The Web based UI is very limited but I managed to set most of the initial basics up but I could not seem to get to a screen that would allow me to use OpenDNS.

I really love OpenDNS, in the world of just doing something basic well this ticks all of the boxes. The basic being that if I am browsing normally I will have a suitably filtered experience that can be easily controlled for all of the family.

So research lead me to the command line interface for this router as this seems to be the only way of doing anything advanced. To access this requires the 80’s throwback a telnet client. If you are using any modern version of Windows then you will need to install the likes of putty to get a telnet client. Other operating systems mileage will vary, seems to be there by default on Ubuntu, on Android Connectbot works well.

So once you have your telnet client of choice, connect to the router by typing the IP address of the router (192.168.254.254 by default – but it will be whatever you typed in to get to it in your choice of web browser initially).

Please note, the commands here are not particularly forgiving and I suggest that if you are not prepared to do a factory reset if this does not work that you stop here.

You should then get a username and password prompt at which you can enter the same username and password that you set in the web interface. You should now have a prompt that ends in ==>. Note you can type help pretty much any time.

Type the following to get the name of the ADSL interface (yes the leading colon is required for safety – you can probably type the command without it and get the same effect):

:ppp iflist

You should see a series of lines; the first couple of which look like:

Internet: dest atm_Internet [05:09:48] retry : 10
 admin state = up oper state = up link state = connected

The name is highlighted above and is Internet on the Demon router set up – this does not seem to be the default for other providers so use their name for this interface. Type the following commands:

:dns server route flush
:dns server route add dns=208.67.222.222 metric=10 intf=Internet
:dns server route add dns=208.67.220.220 metric=10 intf=Internet
:saveall

That’s it – browse to somewhere that does not exist or a known banned site for you and you should see OpenDNS block pages. Note – I have a fixed IP address so do not need to worry about IP address tracking features in OpenDNS.

To get out of the telnet session on the router type:

:exit

Getting Google Cloud Printing working on Ubuntu 12.04

This is my experiences getting cloudprint the headless lightweight google cloud print daemon working on Ubuntu.

I started with the basics and installed the package:

sudo aptitude install cloudprint

and ran it on the command line:

cloudprint

Unfortunately, whilst this prompted for the account username and password it quite quickly told me that it could not connect to the server, despite the Android tablet finding the printer and showing the properties. The current package version is 0.5, I got the latest (0.6) from the git repository with:

sudo pip install --upgrade git+https://github.com/armooo/cloudprint.git

Running this code allowed me to connect and print with cloudprint on the command line. I had to remove the .cloud* files from my home directory to authenticate again.

Looking for ways in which to run this as a daemon at system start (and as a specific user) brought me to this post:

http://blog.nguyenvq.com/2011/05/12/google-cloudprint-on-linux/

However, the script did not work completely and I wanted to create a user called cloudprint (and a group) specifically for this so I created two modified scripts, one as the init script and an installer.

Put this code in a file called cloudprint.sh

#!/bin/bash
# /etc/rc.d/cloudprint
# Description: Starts the Google Cloud Print script on startup
# ----------------
#
### BEGIN INIT INFO
# Provides: Cloud-Print
# Required-Start: $cups $network $local\_fs $syslog
# Required-Stop: $local\_fs $syslog
# Default-Start: 2 3 4 5
# Default-Stop: 0 1 6
# Description: Start Google Cloud Print
### END INIT INFO
case $1 in
start)
echo -n "Starting Google Cloud Print: "
sudo -iH -u cloudprint cloudprint -d
;;
stop)
echo -n "Stopping Google Cloud Print: "
sudo -iH -u cloudprint killall cloudprint
;;
restart)
echo -n "Restarting Google Cloud Print: "
su -c "killall cloudprint.py" cloudprint
sudo -iH -u cloudprint killall cloudprint
sudo -iH -u cloudprint cloudprint -d
;;
*)
echo "Usage: cloudprint {start|stop|restart}"
;;
esac

Secondly put this in a file called install.sh in the same directory:

#!/bin/sh
addgroup --system cloudprint
adduser --system --disabled-password --ingroup cloudprint --shell /bin/sh cloudprint
cp cloudprint.sh /etc/init.d/cloudprint
chown 0:0 /etc/init.d/cloudprint
update-rc.d cloudprint defaults

Make sure both scripts are executable (chmod +x *.sh) and run:

sudo ./install.sh

If all has gone well you will have installed script to run cloudprint in daemon mode as the cloudprint user.

The remaining setup is to run cloudprint software set up the username and password for your Google cloud printing account:

sudo -iH -u cloudprint cloudprint

I would suggest you send a test document to make sure this works before killing it with ctrl-C.

You can now start the daemon with:

sudo /etc/init.d/cloudprint start